Overview
- Customers are correctly configured for Auto Billing
- All applicable default charges have been set up
(See: Auto-Billing Setup for configuration steps)
Prompts & Parameters
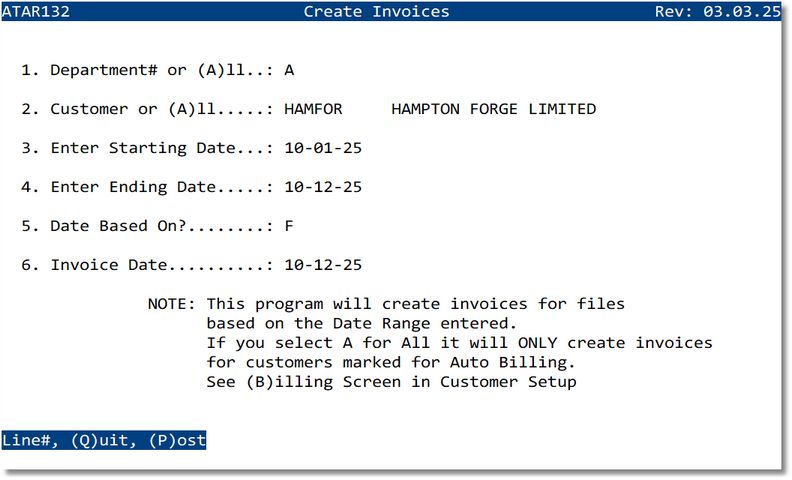
- 1. Department# or (A)ll — Choose a specific Department number or enter A for all departments.
- 2. Customer or (A)ll — Enter a customer code or select A to include all customers flagged for Auto Billing.
- 3. Enter Starting Date — Beginning of the date range.
- 4. Enter Ending Date — End of the date range.
- 5. Date Based On? — Field used to evaluate the range. Typical values:
- F — File Date
- A — Arrival Date
- R — Release Date
- D — Duty Pay Date
- E — Export Date
- 6. Invoice Date — Posting date to apply to the new invoices created by this run.
Create Invoices (Step‑by‑Step)
- Enter Department# or A for all.
- Enter the Customer code or A for all Auto‑Billing customers.
- Enter Starting and Ending dates for the range.
- Choose the Date Based On basis (e.g., F for File Date).
- Enter the Invoice Date to print/post on generated invoices.
- At the command prompt, choose:
- Line# — Jump to a prompt number to revise an entry.
- Q — Quit without saving.
- P — Post and create invoices.
Examples
- Department: A
- Customer: HAMFOR (Hampton Forge Limited)
- Starting/Ending Dates: 10‑01‑25 to 10‑12‑25
- Date Based On: F (File Date)
- Invoice Date: 10‑12‑25
Validation Rules
- Department and date range are required.
- Invoice Date must be within an open accounting period.
- If Customer = A, only customers flagged for Auto Billing are processed.
- Date range must be valid (Start ≤ End).
Troubleshooting
- No invoices created → Confirm date basis and range; verify customer(s) are flagged for Auto Billing.
- “Invalid accounting period” → Adjust Invoice Date or request period opening.
- Customer not found → Check customer code or use A for all Auto‑Billing customers.